Monday, 19 August 2013

Here Fishy Fishy...Canning Yukon Lake Trout

It’s the last day of summer vacation before it’s back to school. It’s been a spectacular summer. The weather was gorgeous, well, after it decided to stop snowing in May! It was the kind of summer that comes along once every 10 years as far as being consistently hot and sunny. The other bonus is that the forest fire smoke, which I usually associate with hot weather, was minimal. I feel so lucky to have had the chance to spend a lot of time outdoors: walking the dog, camping, going to the lake, fishing, canoeing, hiking, road tripping, etc. It’s been great. I feel refreshed and ready to start another year.
The reflection on Mayo Lake was crystal clear!
Part of that outdoor time included a recent fishing trip to Mayo Lake with my friend, Amberley and my hubby. We camped on Gull Island for 5 days. Again, the weather was great as we set out to catch some trout. We love our lake trout! We caught 10 fish total, which were all decent in size. Still searching for that elusive 40 pounder though... We weren’t sure what we were going to do with them. We love to eat lake trout fresh but find that it just isn’t the same if it’s been frozen. I usually smoke our trout, which is delicious, but this year I thought I would preserve it in jars instead so that I could have a ethical and sustainable alternative to buying canned tuna or salmon. As well, canned trout is a little more practical for every day consumption than smoked trout, which is more of a treat for special occasions.
A nice trout for eating!
I am totally new to canning/jarring. I’ve jarred some jelly before but that’s the extent of it. In anticipation of canning/jarring something this year, I picked up a copy of the Complete Book of Home Preserving put out by Bernardin (the jar company). I already have a canning kit (big pot, rack, funnels, magnetic for putting on lids, etc.), which has gone mostly unused since I bought it a couple years ago. The thing with canning fish, however, is that because it is low in acidity and can easily spoil, it needs to be canned in a pressure cooker. Pressure cookers scare me! Don’t people make bombs with these things?! Anyways, I was a little hesitant but I bought one. People have been using these things for over a hundred years after all. 
My new pressure cooker,
After perusing several recipes in books and online, I decided to go with the recipe on page 394 of the Bernardin book. I wanted to keep the recipe simple so that the wonderful flavour of the fish would not be lost in the seasoning. In this recipe, the fish is simply brined in a salt water solution for an hour, packed into jars, and then pressure cooked for the allotted time. Of course, as Amberley and I are both novices, there was a lot of second guessing and questions. All I can say is, what on earth did people do before Google and YouTube?! The other thing with using a pressure cooker, is if you suspect that you’re doing something wrong, you can’t just lift the lid and take a peek!
Page 394- Canning fish
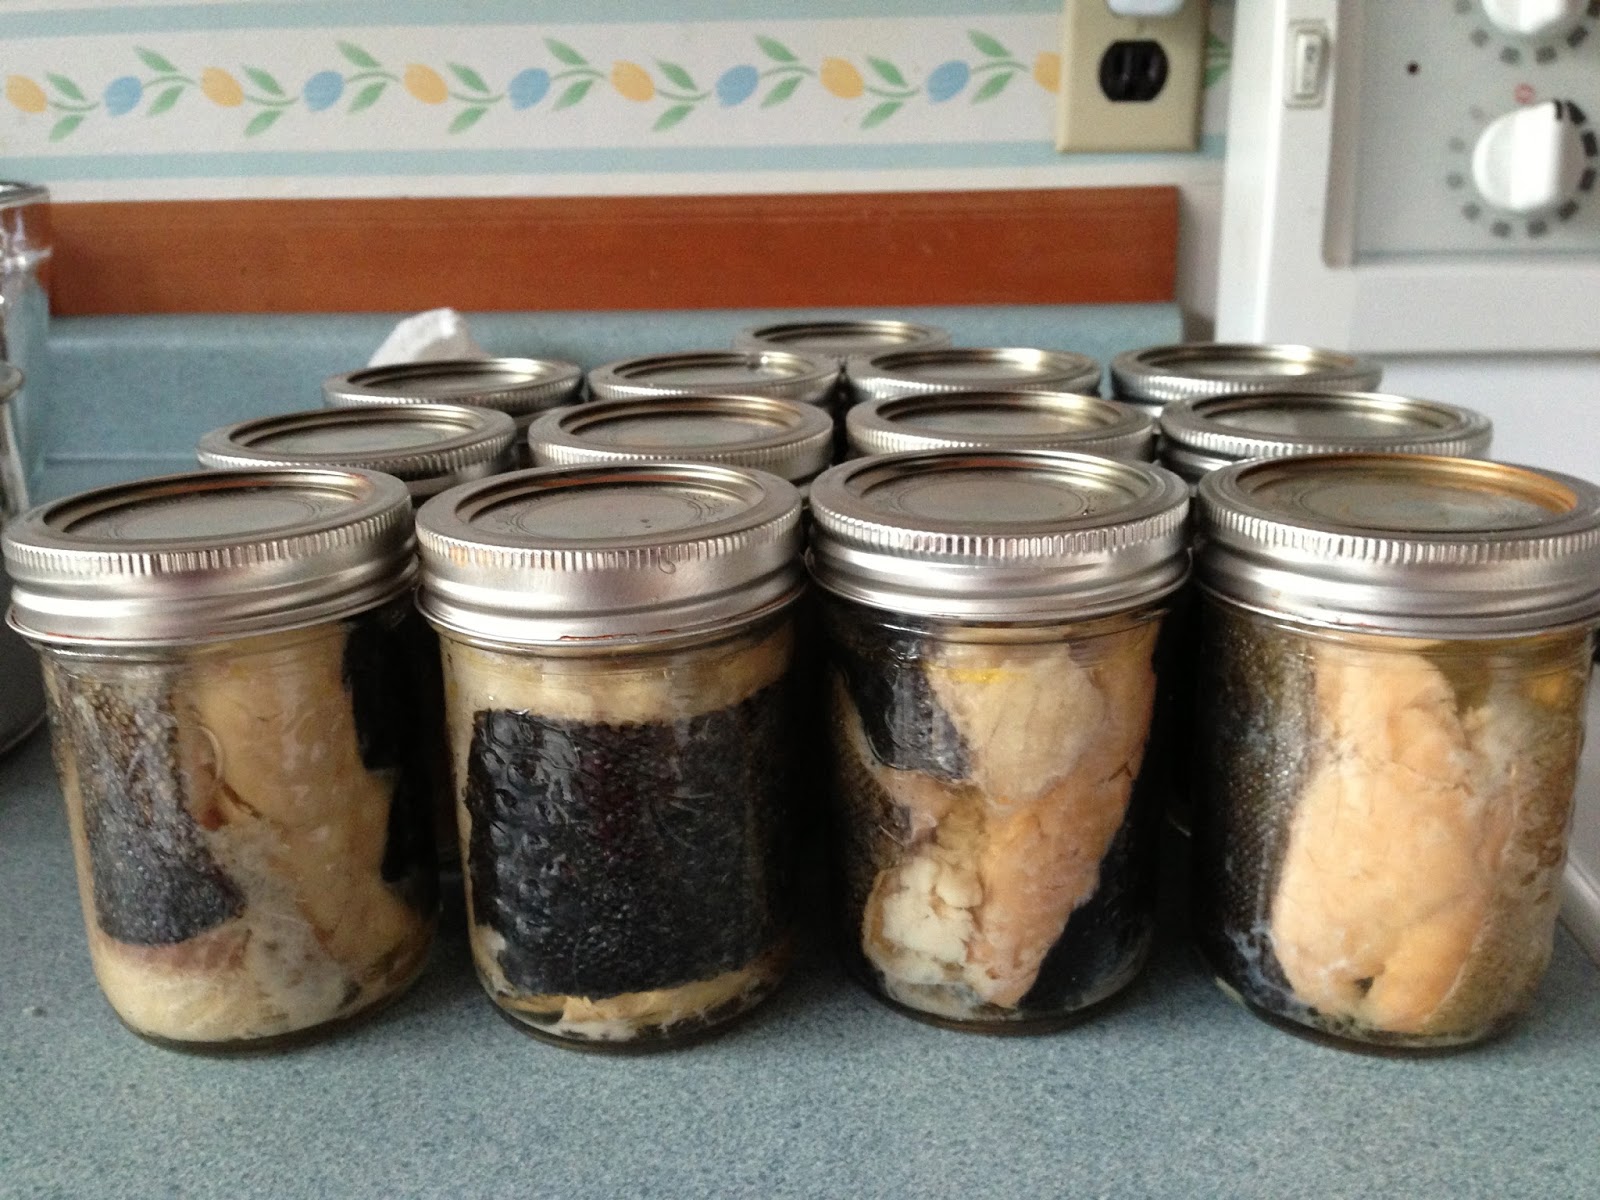
In any case, the fish turned out! Rich, tender, flavourful. I’m so pleased we went this route. I can’t wait to explore some recipes that call for canned tuna or salmon and use this gorgeous canned trout. 
Fish cut up and soaking in brine.

Jars waiting to be filled.

Stuffing the jars.

Beautiful looking fish!


Pressure cooker is full.

The end result!
This past weekend was Discovery Days, a territorial holiday, which celebrates the discovery of gold in the Klondike. One of the events as part of these celebrations was the Horticultural Exhibition, which celebrates local food production. Now obviously my garden was not going to produce any entries. However, I noticed that one of the categories was Canned Goods & Preserves- Meat & Fish. I thought, what the heck, I’ll take down a jar. As fate would have it, our canned trout won first place! Okay, it was the only entry but I’ll take it. I’ve been wearing my ribbon around every since... It truly is award winning fish!
First Place ribbon!
I think canning might be addictive. When I went down to the Horticultural Exhibition to retrieve my trout, a guy offered me some cucumbers. What did I do? I came home and made pickles. Then as I was making pickles and had some pickling solution leftover so I thought I’d make some pickled carrots. Today I whipped up some salsa and at some point this week, I’m going to get canning up some tomatoes. It’s harvest time in the Klondike! Love it! Happy Discovery Day!

Monday, 5 August 2013

Vive le Farmer’s Market!

It’s early August and our local farmer’s market is in full swing. Last week I arrived late but still managed to pick up romaine lettuce, kale, radishes, english cucumbers, zucchini and basil. I couldn’t help but get the feeling that I missed out on a few things as I noticed all the empty bins. This week I got there right at 11a.m. Holy hoards, Batman! Hoards of people! Hoards of food! I probably picked up more than I needed but I just couldn’t help myself. Potatoes, broccoli, cauliflower, tomatoes, peppers, fennel, radishes, peas, carrots, green onions. I’m set! You might have to wait in line but what a treat! If only I could successfully grow some of these things myself.
Bounty of the week!
My dad grew up on a small farm in rural Alberta. During my childhood, I was regaled with romantic stories about life on the farm. Growing up in the Yukon, I had a blissful ignorance about what living on a farm might actually entail. There weren’t too many farms around that I was aware of. As I moved into adulthood, I came to realize that not all was butterflies and rainbows down home on the farm. However, my dad had this innate ability to cast this wonderful portrait of a bygone era filled with fanciful images, characters and adventures. He made magic out of the dung pile. It couldn’t be that hard! Thanks to dear papa, I’ve always sort of felt that there was a little farm girl somewhere inside me. 
Naturally, when I built my house a couple years ago, I also build several raised garden beds and a green house. I had all these visions of bountiful harvests and going back to that pioneer lifestyle of providing for myself. The thing is, I never grew up gardening. My parents don’t garden. So really, I have really no idea what I’m doing.
The first year, my garden made more food then I knew what to do with. It was great! I got this idea in my head that gardening was easy. It must have been a bumper year...
The second summer I was getting married, I was incredibly busy and didn’t have much time to take care of the garden. I planted some potatoes and other vegetables that I figured didn’t need much tending to. It was not a bumper year. The potatoes were small and few. It was winter before my other vegetables had the chance to produce anything. I also started to get the impression that there was something wrong with my soil. It was growing moss on top and it was very dense. I don’t think the roots could grow. I’m still figuring out what is wrong with the soil. I have consulted a few people. Perhaps the soil is too acidic. Perhaps I added to much peat moss. Maybe I should add some ash or manure or compost or dolomite? I’m working on it but apparently these things can’t be cured over night. 
It probably doesn’t help that I often leave town in the summer months. You see, I’m a teacher so I have summers off. It’s really the only time of year where I can travel. So, unfortunately for my garden, it goes for periods of time trying to survive on its own. That also makes it hard to determine if the soil is the problem or just lack of water. 
This year, shortly after the garden was planted, I left town for 3 weeks. I came back and most of it had never gotten off the ground as the little plants just shriveled up and died. What did survive were the plants that had had a head start because I bought them as seedlings. The lettuce was fine, as were the zucchini and the sunflowers. What didn’t survive were the herbs, except a couple dwarf basil plants- no, dwarf is not the variety! About half the carrots didn’t make it. The tomatoes are growing fine, except they never got pruned and are sort of tilted over. I’m not sure how productive they will be. The kale seems to be doing well. Then I left again for a couple weeks. Upon my return this time, my radishes had all gone to seed as well as what did come up from my mesclun lettuce mix. I’m sort of feeling like the mass-murderer of plants. Maybe I’ll just stick to kale. It doesn’t seem to suffer abandonment issues like my other vegetables.
To make a long story short, it appears I’m not quite the farmer that I imagine myself to be. I’ve got a ways to go before I will be producing a bountiful cornucopia from my own backyard. In fact, my gardening skills seemed to have actually gotten worse over these past couple years. Thank goodness for the farmer’s market!


Even though our local farmer’s market only has a few vendors, they produce quite a variety of vegetables. I’m always impressed by the size and quality of the produce that comes out of the Dawson area. In fact, I sometimes wonder why I even bother with my own garden when I can buy everything I might need at the market.
Comparing farmer’s market vegetables to the produce in the store, the locally produced stuff is vastly superior as well. I don't understand why more people don’t shop at farmer’s markets! I've heard some people claim that it's more expensive. But is it really? Obviously I’m biased because I don’t have a big family to feed and I place a great importance on food so I don’t mind spending good money on quality products. However, I feel that people generally (and I’m guilty of it too) waste a lot of food. It goes bad in the fridge before you can use it. The beauty of the produce from the farmer’s market is that it is so much fresher that it actually lasts longer! So actually, you do waste less, which has to be more economical! 
As local produce hasn’t travelled thousands of kilometres, it is fresher and also has not burned nearly as many fossil fuels to arrive on your plate. On this topic, I’ve really started paying closer attention to labels in stores to see where food is actually coming from. You can get a lot of good produce from our southern Canadian provinces if what you need is not available at the farmer’s market. They are a lot closer than California or better yet Chile or South Africa! If you can eat food in season and try to get food from as close to home as possible, you are doing your part to minimize your impact on the environment and are therefore eating more ethically.
The other thing I enjoy about the farmer’s market is supporting the local economy. You know the sad part? Our local producers actually throw out a ton of produce each year because they can’t sell it! I think I’m going to try jarring some local tomatoes this year so that I have a supply for the winter months and that way I can avoid buying canned tomatoes from elsewhere. I’ve never jarred anything except jam so it should be interesting. Speaking of jarring, we are headed out to our favourite fishing hole today. Yes, I’m leaving my garden to its own devices once again...  Depending on our catch, I just may try jarring some trout as well. I suppose it is possible to embrace that pioneer lifestyle even if your gardening skills are somewhat lacking.
À bientôt!

Saturday, 3 August 2013

'O Glorious Summer of Cheese, part deux

I’m just going to come right out and say it: I had a little freak out. A child-like tantrum. Burned milk, too much rennet? No, it was over my inability to count to 8. 8 litres of milk. It was pretty sad. But making cheese is stressful! Especially when you’re making a cheese you’ve never made before, you’re doing it by yourself, you have nobody to consult with, and you can’t just run out to the store and get more milk if you mess it up. Like a child, I also recovered almost instantly. I realized that I just had to chill out. However, when you’ve been building something up in your mind, it’s easy to get overwhelmed. But I’m cool now. I survived. I’m okay and so is the cheese. So for any would-be cheese makers out there, I’d say: approach it like a big experiment, don’t beat yourself up and try to enjoy yourself! It’s not nearly as difficult as I thought it was going to be once I just relaxed a bit. That was the feta. Now that I’ve got one batch under my belt, I think I can tackle future batches with more confidence. 


In any case, I won’t go step by step to explain how I did the feta because what you need to know is already online. I used this kit to make my feta: http://www.makecheese.ca/products/feta-kit-make-10-batches-of-homemade-feta 
If you’re more curious about the process, the instruction sheet that accompanies the kit is here: http://cdn.shopify.com/s/files/1/0172/8570/files/Recipe_MAKE_CHEESE_Feta_1.pdf?67
Here are some pix:
Milk has reached 93 degrees F (33 degrees C). Put down the camera and add the feta culture & calcium chloride!
Cover and keep warm while the culture ripens giving it that feta flavour!
Add rennet, let it sit again for another hour then slice it up.
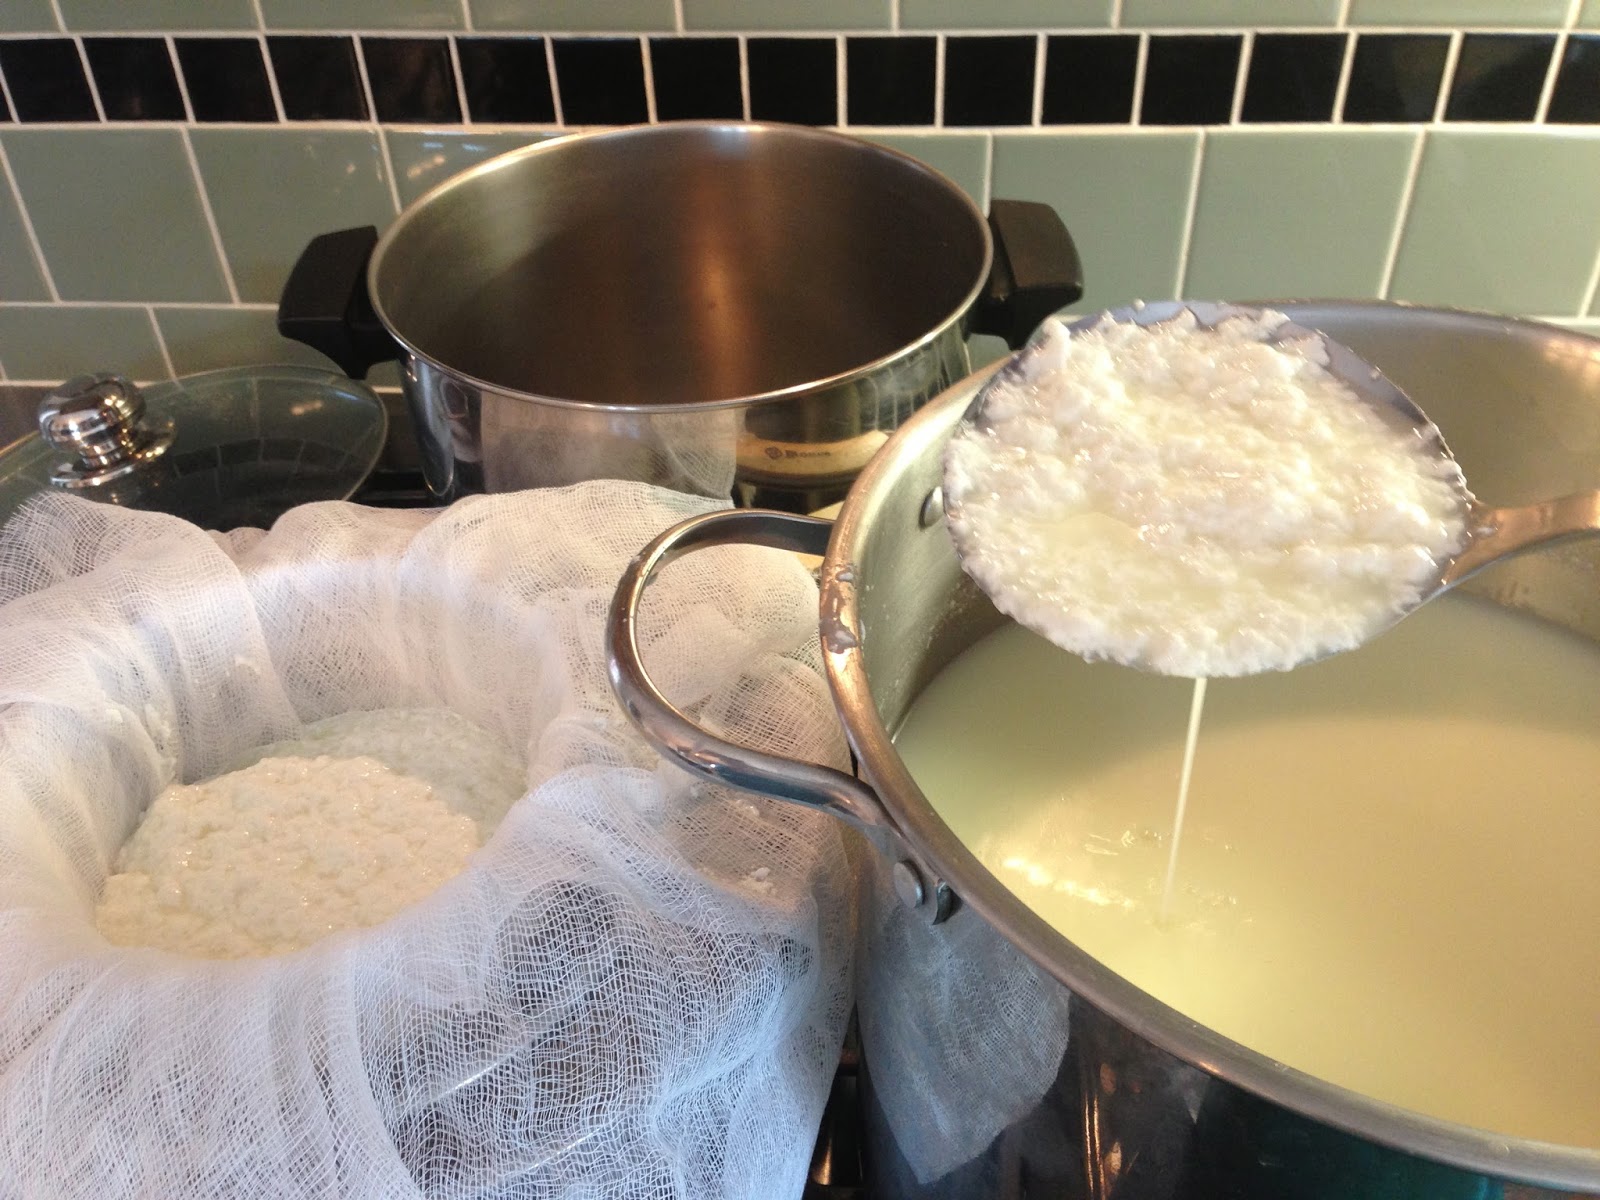
Look at all that curdy goodness!

Stir, let it settle then transfer to molds lined with cheesecloth.

Two chunks of feta draining overnight. One is being weighted down.

Looks like feta

Cut, salted, & draining/drying.

Feta stored in brine. Ready to eat! Yum!

The mozzarella making was much more smooth. I followed the instructions from the cheese making course. See Goats Do Roam post. All was well. The only thing about the mozzarella was that when we made it in the class we wore gloves. When I made it at home I didn’t wear gloves. When you’re stretching the cheese, it’s VERY hot. I think the gloves absorb some of the heat. Next time I will track down some gloves for my poor little fingies.


Five little discs of mozzarella ready for the freezer. One ready for eating!
My only issue with cheese making in general is that it takes a heck of a lot of milk to make a fairly small amount of cheese. That’s fine for cheeses like feta where you generally only use a little bit at a time. But mozzarella? I could eat what I made in one sitting! Anyways, I froze the mozzarella in an attempt to slow down my consumption. If I ration it out a bit, maybe it’ll last longer? I think the feta will be fine in the brine. They are both so fresh and delicious. I'm convinced it's even tastier because I know exactly what is in it! Guess I need to get some more goat’s milk.

Saturday, 27 July 2013

B-b-b-bird, bird, bird. Bird is the word.


A while back, my friend Jennifer, who had been subjected to me lamenting the lack of protein in my life, took pity and bestowed upon me one of her Hutterite chickens. Her family is from Saskatchewan and they have been getting Hutterite chickens for years. Now, I don’t know much about the Hutterites but I’m going to assume that because they typically use traditional farming practices and they are a group of people that adhere strongly to their traditions that the use of pesticides or GMO products would be a strict no-no. I’m also going to assume that because of these traditions that they treat their animals with dignity and respect. Therefore, it seems that Hutterite chicken is about as ethical as you can get.

So, what happens when you have one chicken? Do you save it for a special occasion? Do you roast it whole? Do you debone it and ration it out? These are serious considerations. I certainly didn’t want any of it to go to waste! I think because I didn’t know for awhile when I would be getting my next chicken, I didn’t do anything with it. However, I did put my chicken order in with Aurora Mountain Farm and my chickens will be arriving on my doorstep any day now. It’s time to use that Hutterite chicken! As an old friend from high school was in town for a visit, I decided I would try it out on her!
Did I mention that it’s massive?! A 7 pounder! I came across a recipe in one of my fave cookbooks, Whitewater Cooks at home. The recipe was Tuscan Style Lemon and Herb Split Chicken, p. 124. It seemed like a great summer recipe. The chicken was to be cooked on the BBQ and used fresh herbs and lemon. Very summery. Well, in the end it turned out quite nice but it was not without its challenges. It turns out it’s rather difficult to manoeuvre a large bird split in half (but still attached) around on a BBQ. I think in the future I would only do this recipe if I were using a smaller bird. It might be even be better if I were using a different species all together such as a cornish game hen, squab, quail or even a local wild bird, such as a ruffed grouse. It might be a lot less hassle just to do it in the oven as well. 
Here was our menu for the evening:
Appetizer:
Herbed Chèvre & Pistachio Balls served with Sourdough bread & crackers
Main Course:
Tuscan Style Lemon and Herb Split Chicken (with assorted dijon mustards)
Roasted Potato Wedges
Summer Salad
Dessert:
Assorted squares from the local bakery, Cheechako’s

Here are the recipes:

Herbed Chèvre & Pistachio Balls 
This is a great, easy, make ahead appy that always goes over well! They were all gone before I remembered to take a picture!

300g creamy goat cheese
1 tsp. finely chopped fresh thyme
1 tsp. finely chopped fresh oregano
1 tsp. finely chopped fresh basil
1/8 tsp. cayenne pepper
4 small pieces of sundried tomato, minced (the kind that are kept in oil)
2 small garlic cloves, minced
1 cup finely chopped pistachio

With a fork, mash together all ingredients except the nuts. Form into small balls and roll into the nuts. Cover and chill for up to 2 hours before serving. Can be made up ahead.

NOTES:
1) If the goat cheese is not room temperature, you can defrost it slightly in the microwave. You just want to be able to mash it easily.
2) I didn’t have fresh thyme so I used 1/2 tsp of dried thyme instead. When using dried herbs, reduce the amount by at least half!
3) 2 garlic cloves make it very garlicky so you may want to only use one.
4) I took the balls out of the fridge an hour prior to serving so that they were soft and spreadable on the bread or crackers.

Tuscan Style Lemon and Herb Split Chicken
This chicken is split down the middle and marinated overnight in a mixture of lemon juice, zest, olive oil, fresh herbs, paprika, salt and pepper before being cooked on the BBQ. I made quite a few variations to this recipe so below is what I did, not the original version of the recipe. However, I did scale the measurements here as if I was using a bird half the size. Using a 7 pound bird is not recommended for this recipe unless you are baking it in the oven!

Ingredients:
1 whole chicken (3.5 lbs)
5 lemons (for zest, juice & garnish)
3 tbsp olive oil
3 cloves garlic, minced
1 tbsp fresh oregano, chopped
1 tbsp fresh rosemary, chopped
1 tsp smoked paprika
1 tsp pepper
1 tsp salt, plus more to taste

Directions:
1) Split the chicken by first removing the backbone. Turn the chicken onto its breast so that the back is facing up. Use your fingers to feel where the backbone is located then use a sturdy pair of scissors to cut down one side of the chicken right next to the backbone (you’re basically cutting through the ribs). Then cut along the other side of the backbone and remove it completely. Next, open up the bird and with a sharp knife slice the breast bone with your knife (don’t go all the way through). You want the bird to lay flat. You can use your hands and press down on each breast to crack it further. Flip the bird back over and put it in a baking dish.
2) Wash the lemons, and prepare them. You need 1 tbsp of zest. Then you need the juice of 2.5 lemons for the marinade. Save the other lemons for when you are actually cooking the bird.
3) Combine the lemon juice, zest, olive oil, garlic, oregano, rosemary, paprika, salt and pepper.
Pour the marinade over the bird and rub it all over. Cover and refrigerate overnight.
4) Pre-heat the BBQ to high heat then turn it down as low as your BBQ will go.
5) Remove the chicken from the marinade and sprinkle with salt all over.
6) Place the chicken on the BBQ skin side down on the grill allowing for grill marks to form. When lifting off grill, lift slowly to avoid tearing skin. Move to the top rack and allow to cook, flipping every 15 minutes or so for even cooking. Occasionally squeeze lemon juice over the bird as it’s cooking from the remaining lemon halves.
7) Cooking time will vary. Allow for approximately 1.5 hours for a bird of this size. (My 7 pounder took 3 hours!) Use a meat thermometre and ensure that meat has an internal temperature of 165 degrees F in its thickest parts. Check both the leg and breast meat.
8) When the chicken is almost done. Grill the remaining lemon halves face down.
9) Serve on a large platter garnished with grilled lemon halves and sprigs of rosemary.

NOTES:
1) The original recipe says to cover the chicken with bricks or rocks covered in tinfoil on top of the chicken to flatten it. I presuming that they want you to do this to help make nice grill marks on the bird. It sounded a little too labour intensive to me so instead, I placed a baking sheet on top of the chicken loaded with 2 heavy cast iron frying pans. It then says to put down the cover and let it cook for 40 minutes. The problem is they say that your BBQ should be about 200 degrees F. My BBQ wouldn’t go lower than 400 degrees F. There was no way that I could leave it on the lower grill or it would be charred to bits. So what I did was let it get those initial grill marks, then I removed the weight and then I moved the chicken to the top rack so it would not be in the direct heat and burn. I’m not convinced that I needed to add that weight on top of the bird. I’m pretty sure you will still get nice grill marks and it might actually be better because, as careful as I was, I lost a lot of skin when I lifted it off the grill. I’m guessing it was difficult to remove from the bird from the grill because it was being pressed down so hard. Next time I’ll forgo the weight and let you know how it turns out.


 2) I also found that I had to turn it several times to ensure even cooking, which was awkward with a very large bird, all the more reason to use a smaller bird. The legs cooked much faster than the breast. Luckily, dark meat handles longer cooking times well without getting dried out. When I cooking this bird, the legs actually came off the body when they were done. I removed them from the grill and kept them warm while the rest of the bird finished cooking.

The final product!
Roasted Potato Wedges
10 small potatoes
olive oil
herbes de Provence
paprika
granulated garlic
salt & pepper
red chili flakes

Wash and cut potatoes into wedges. Toss potatoes in a bowl with the remaining ingredients. Lay on a baking sheet lined with parchment paper. Bake in the oven at 400 degrees F for an hour or more until crispy and done. Stir a couple times through the baking time for even cooking.

Summer Salad

The summer salad consisted of red leaf lettuce from my garden, a bit of thinly sliced red onion, toasted almond slivers, halved blackberries. The vinaigrette consisted of grainy dijon mustard, red wine vinegar, a touch of maple syrup, s/p, grapeseed oil.


So as you can imagine, trying to get this bird cooked must have been quite the spectacle. However, the end result was worth it. It was delicious and the lemon flavour really came through. I will definitely make this recipe again now that I know what I'm doing. For you it will be much easier because I’ve done all the hard work. Just follow my suggestions and you should be fine! As for myself, in the future, I think I will keep the experimentation to a minimum when I have guests!

Wednesday, 24 July 2013

FARM

Eating well on the road can be a challenge if you don't do your homework. I’ve been away quite a bit this summer. One trip took me to Alberta for my baby brother’s wedding. Following the celebrations, my hubby and I took a little road trip around Alberta. We covered quite a bit of ground in the 4 days that we had to explore. As I haven’t spent too much time in my adult years in Alberta, the big question was: where should we eat? A month or so before we left I quizzed a friend of Amberley’s who is a real foodie and who also went to school in Alberta. She made some wonderful suggestions but the one that I really feel the need to share is Farm, located in Calgary.


We had only one night in Calgary and after checking out their website (http://farm-restaurant.com), I knew it was the one restaurant on this trip that I HAD to try. Their whole philosophy is that they use local suppliers, they are inspired by the foods produced in Alberta and they work with farmers who care for their animals and the land. Sounds right up my alley! I was stoked! The only problem is... when you have really high expectations for something, it’s really easy to be disappointed.
Well, I won’t keep you in suspense. It was a marvelous experience and actually went above and beyond any expectations that I possibly could’ve had. Here’s how it all went down:
We rolled into town and basically drove right to the restaurant. We weren’t hungry but we wanted to check the place out and then spend a bit of time getting our bearings in this sprawling city. We entered the small restaurant and were greeted by the friendly, young hostess. Even though it was a Tuesday, she said that it would be very busy and that she couldn’t guarantee us a table but that she could save us a spot at the bar. The bar is a countertop that surrounds the open kitchen. Even better!
Returning a couple hours later having worked up an appetite, we were seated at our spot at the end of the bar with a full on view of the kitchen. I was in culinary heaven! My husband, JM, started with an Amber's Lunch Pail Ale and I sampled their made-in-house iced tea. I ordered the Crispy Duck. JM ordered the Silver Sage Strip Steak and the house pickles. We then sat back and watched, with great interest, the bustle of activity coming out of the small kitchen. We were perched right in front of the guy in charge of desserts and cheese plates. It took all self-control not to simply reach over and snatch up a morsel of cheese or two.
The drool must have been pooling on the countertop or something but for reasons unbeknownst to us, the chef noticed us and announced that he felt that we had been waiting too long and that something must be done. We certainly didn’t feel that we were waiting too long, however, I was never one to argue with someone thrusting food in my direction! 
To start, a round of drinks came to us. “Are you having iced tea?” My response, “Well... I can drink!” (As in alcohol.) “What do you like?” “Wine. Red.” Our server, a charming blonde Betty Boop lookalike with a 50s style hair do, dark penciled in eyebrows and bright red lips, promptly brought over the wine list and recommended a red that would complement my duck. Don’t mind if I do! 
Then the sous-chef brought both JM and I the market salad of the day. It was a salad of baby romaine with a mix of lightly sauteed mushrooms, heirloom tomatoes in a dill vinaigrette and topped with pine nuts. It was lovely! 
Market Salad
Soon after came our main courses. JM’s steak was cooked to perfection and accompanied by chimichurri sauce and herb crème fraîche as well as roasted potatoes and shallots. My duck was served, perched on a bed of micro greens with an asian inspired vinaigrette. It was topped with crispy shoestring potatoes and surrounded with a moat of Thai peanut sauce. Soooo good.
The Crispy Duck
During the course of our meal, the chef came over several times to check on us and describe the various dishes to us. He was very friendly and obviously passionate about he was doing. He apologized that we had to wait- even though, like I said, we didn’t notice. He explained that their kitchen, which was quite small, that they only had 6 burners & 2 ovens but that even so, he doesn’t like his customers to have to wait more than 15 minutes for food. The pace that he and his kitchen staff were pumping out amazing, quality dishes that were just as delicious as they were beautiful was nothing short of miraculous. I really enjoyed watching the interplay between the various staff. Although they were super busy, they were all smiles and genuinely seemed to be having a good time in that tiny kitchen. I guess that’s how you know you’re cut out for the restaurant business, your ability to handle stress with grace and humour!
Macarons
After dinner, I headed off towards the back of the restaurant where there was a full on cheese shop. I wasn’t really in a position to stock up on cheeses but it was fun to have a look! When I returned to my seat, I arrived to house-made macarons. Being a self-proclaimed connoisseur of the French macaron (as in I’ve eaten more than my fair share of them), I can assure you, they were tip top! John and I decided that we would share a dessert and have a coffee and just linger a bit to draw out this experience that we were so thoroughly enjoying. The coffee was in a French press. Made to order in our own little bodum. We had the chai carrot cake with vanilla bean icing that was garnished with a pistachio brittle. Yes, it was really as fantastic as it sounds. 
Chai Carrot Cake
As we were getting up to leave, the chef came over again wanting to ensure that we had enjoyed ourselves. He reiterated that it was so important to him that we not only enjoy the food but the experience. We thanked him profusely and assured him that we were so grateful and overjoyed. I let him know that that we had been looking forward to eating here for a while now. I explained that I was particularly interested in their establishment because of their dedication to using local suppliers and knowing where their food came from. He was happy to hear that we were of the same ilk as he not only seeks out local food for the restaurant but also at home. It was one of those happy, feel good moments that you really don’t want to end. But it did. 
Earlier in the evening, we had assured our server that we really didn’t feel like we had been made to wait and that we didn’t feel deserving of all the special attention. She mused, “I’m not sure why he has singled you two out, but I’d say: LET IT RAIN!” And that we did! It was such a great evening. It will go down in my books as one of my most memorable meals. And like the good chef said, it was just as much about the experience as the food. 
I have a feeling I will soon be spending a lot more time in Calgary. There is a food scene that needs to be explored in more detail. And if you are ever in Calgary, you must eat at FARM! I insist. You may not be the pet of the chef on that particular night, but you won't be disappointed!

Tuesday, 23 July 2013

'O Glorious Summer of Cheese

I have not been wanting for cheese this summer. In fact, I’ve been cheese rich! It has been a wonderful and gluttonous time. Cheese, I’m convinced, is the real fast food. You just slice it, slather it or pile it on some crusty bread, cracker, fruit, pie or eat as is and you are good to go. You have a delicious, gourmet treat that takes no time at all. Satisfying not only because of its flavour but has the requisite protein and fat to fill you right up!

In my quest to eat not only delicious but ethical cheese, I have gotten to know the fine folks at the Lendrum Ross farm who produce some fantastic cheeses. While in Whitehorse back in June, I stopped by the Fireweed Market (http://fireweedmarket.yukonfood.com) to load up on their cheeses before heading back north. I went early as I had been warned that they sell out quickly! I picked up some halloumi, feta, chèvre as well as some goat yogurt fudge. 

I had heard about their halloumi before but I was finally going to taste it for myself! In anticipation I bought two pieces. One I shared with with my friend Amberley, who I often stay with while in Whitehorse. We sliced it into squares and fried it in olive oil then squeezed lemon juice over it with salt and pepper. It was delicious! We started out by putting it on a lovely market produced olive bread but quickly discarded it, opting to eat the cheese on its own. Anything else would just be filler! It reminded me of a cross between saganaki and cheese curds. It had the fried crispiness and flavour of saganaki but the squeek of cheese curds. 


On the second halloumi eating occasion, I casually offered some to my small step grandchildren assuming that they wouldn’t be interested in such a thing. I quickly had to ration it out as they chowed down with reckless abandon. I eventually had to cut them off all together. Whatever feelings of guilt I suffered about my inability to share quickly wavered as I devoured the last slices. 
The beauty of the chèvre was that is was mild and spreadable and tasted so wonderfully fresh. I was still skeptical that the kids would be interested in it but after spreading it on some crackers, which I then sprinkled with salt and freshly ground pepper, I couldn’t keep it coming fast enough. I was a little more willing to share this go around just because I had more...
The feta was used mostly to add some tang to some delectable summer salads, which was good because that meant that a little went a long way. Mmmmm...
In addition to the goat cheese of the Lendrum Ross Farm, I came across Moonstruck Organic Cheeses (http://www.moonstruckcheese.com). This small farm/cheese maker is located on Salt Spring Island. They make homemade free range cow’s milk cheeses that are certified organic. According to their website, they have a small herd of about 25 cows. I would love to visit them one day!

In the Yukon, you can purchase their cheeses from Riverside Grocery (http://www.riversidegrocery.ca), Whitehorse’s go-to store for just about anything. It’s been around for years and as they claim, “If we don’t have it, it’s not worth having!” They carry a wide range of products and any trip to Whitehorse includes a stop at this unique little gem of a store. But I digress...
White Grace, Savoury Moon, White Moon, Ash-Ripened Camembert, Farmstead Feta are just some of Moonstruck Organic Cheese products  that I have enjoyed. If I had to pick my absolute fave, it would be the Baby Blue. It even won a bronze medal in 2008 at the First World Jersey Cheese Competition on the Isle of Jersey. It just might be the perfect cheese! You can read more detailed descriptions of their cheese on their website. So glad that I am able to get my hands on these fantastic products.


Ash- Ripened Camembert on the left & Savoury Moon on the right. Oh so good!
While on a recent vacation, I admit that I did eat some cheese whose ethicality (is that a word?!) was unknown to me but I’m assuming that due to its mass-produced nature that it could not possibly be ethical. I didn’t feel guilty. It’s difficult to control what types of food you will have access to when you are traveling. What I did observe, however, was that the small farm produced cheese that I have become accustomed to eating is a far superior product. Mass-produced cheese is bland, uninteresting and feels like you are eating plastic. Really? What’s the point? 
With a renewed sense of enthusiasm for small scale produced cheese, I got my hands on a feta making kit and some rennet and ordered up some goat’s milk. I’m taking cheese making to the smallest scale of production. I am going to try and make it myself. 16L of goat’s milk. 8L for mozzarella. 8L for feta. Yikes! Just don’t mess up...


Goat's milk awaiting its transformation into cheese.

Wednesday, 12 June 2013

Birthday Menu

Wow… that was sort of cruel. I put out a teaser for an upcoming post and then I disappeared off the face of the earth for a month. Well, as you know, life has a way of getting really busy from time to time and sometimes things have to go to the back burner for a bit.

In any case, I’m pleased to report that I’m still embracing the ethical omnivore lifestyle. I just haven’t had the chance lately to report on it. It seems like going back to tell you about my birthday menu might be a little too far in the past but I will anyways because we had some great food! 

At the party were 15 or so good friends. It was pretty casual. It was supposed to be a BBQ and although we used the BBQ to prepare some of the food, we were confined to house because it was snowing! Yes, snow on May 18th. It was first in my life time!

Here was the menu :
Appetizers
Hummus with Organic Que Pasa tortilla chips
Goat Cheese & Sun-dried Tomato Terrine served with crackers
Main Course
Marinated Moose& Veggie Kebabs
Moose Burgers with all the fixings
Alaskan Scallop Skewers
Tabbouleh & Chickpea Salad
Spinach Salad with strawberries, almonds and a poppyseed dressing
Vegan Potato Salad
Dessert
Pineapple Upside Down Cake
Goat Cheese & Sun-dried Tomato Terrine or as I like to call it: Delish!

Not a bad spread… So you may be thinking, why on earth would you want to go through the trouble of preparing all that food on your own birthday? Just to be ethical? No actually, I have often prepared dinners for friends on my birthday because one of the things I love about cooking is making things for others and giving them joy. Many of my friends who are avid cooks do the same. Plus, you can be guaranteed you’re going to eat well! Being ethical was just an added advantage. I did mention to dinner guests who I know have been following the blog that it was ethical but most of them were none the wiser and would not have been able to tell the difference anyways! One particular guest, who has an aversion to eggs, was delighted to finally be able to eat a potato salad because it did not contain eggs.

So, going through the menu, I fully admit that I took lots of short cuts with this meal. I’m a normally “from scratch” kinda girl but I did not want to work too hard! It was my birthday afterall! So yes, the hummus was store bought although I jazzed up the presentation by transferring it to another dish and adding some garnish.

The goat cheese appetizer is a fabulous dish that can be made the day before. It comes from the Whitewater Cookbook series. I will add these books to my book listing in the Food for Thought post. There are several wonderful dishes in all three of these books. This particular recipe is found on page 28 of Whitewater Cooks At Home. You line a dish with plastic wrap and put down a layer of softened goat cheese-unripened. It says in the recipe to beat until fluffy and smooth. What I did was soften the cheese slightly in the microwave, which made it easily spreadable. After putting down the first layer, put on a layer of pesto (I used store bought), chopped up sundried tomatoes, some chopped, fresh basil and parsley then add another layer of the goat cheese. Wrap it in the plastic and refrigerate to firm up. When firm, unwrap and place it on a serving plate, garnish with a balsamic vinegar reduction, toasted pine nuts, capers, a basil chiffonade, kalamata olives and cherry tomatoes. Simple! See, you don’t even need the recipe. Serve with baguette, toasted pita, crackers, etc.

For the main course, we marinated cut pieces of moose steak several days in advance. We just used a random kebab recipe from the internet and threw in a few extra ingredients. I wish I had kept it because it was a gooder… Loaded up some skewers with the meat, peppers, onions, mushrooms, etc. and cooked them on the BBQ along with some moose burgers. I don’t tend to keep recipes for burger seasonings so sorry, nothing to share. For the burgers, we got the local bakery to make up some fresh buns, which made them extra nice.

The scallops were purchased from Frisky Fish in Whitehorse and came from a small bay in Alaska. I tossed them in olive oil, lemon zest, garlic and s/p. Much like the mozzarella cheese from the cheese making workshop actually. Then I skewered them and cooked them on the BBQ. Yummy!

The Tabbouleh and Chickpea Salad was a new recipe. It came from page 43 of the Whitewater Cooks book. It’s the first time I’ve ever used bulgur and I was very pleased with the results. It's a yummy recipe full of flavour with ingredients like chickpeas, green olives, feta cheese, tomatoes, cucumber, red onion and herbs and spices. I used a The Farmstead Feta from Moonstruck Organic Cheeses from Salt Spring Island. The only change I made from the original recipe with that I reduced the amount of vinegar by about half as I was worried it would be too acidic with the lemon juice and vinegar. It was great!

The spinach salad was very straight forward: spinach leaves, sliced strawberries, toast almond slivers and a homemade vinaigrette with dijon mustard, white wine vinegar, maple syrup, s/p, poppyseeds and grapeseed oil.

The vegan potato salad was from this website:
Check it out! It’s called Creamy Fingerling Potato Salad. However, I didn’t use fingerlings. I just used baby potatoes. I also didn’t use quite as much shallot as in the recipe. The other change was that I didn’t use Yukon Gold potatoes for the dressing. I just took a few of the baby potatoes and mashed them up, skin and all. It was very good.

Now for dessert: Pineapple Upside Down Cake -one of my favorite childhood cakes. This recipe is from my momma. I figured that this cake would be good because you don’t necessarily need ice cream to go with it. Luckily I had some organic butter from Avalon dairy. When you need a buttery taste, margarine just won’t do. I ran out of regular flour so I substituted in some spelt flour, which made it soft and dense. I used local eggs and unsweetened almond milk instead of regular milk. It was delish!

Pineapple Upside Down Cake
Melt 1/3 cup butter into a 9 to 10 inch pan. Sprinkle ¾ cup of brown sugar over the melted butter. Place drained, canned pineapple slices on sugar mixture. Maraschino cherries may be placed in centres of pineapple slices, if desired.

Mix together:
                1 ½ cups all-purpose flour
                ½ teaspoon salt
                2 teaspoons baking powder

Cream:
                2/3 cup butter

Gradually blend into butter:
                ¾ sugar
                2 eggs
                1 teaspoon vanilla
Beat until fluffy.

Add dry ingredients alternately with:
                2/3 cup milk

Spoon onto pineapples in pan. Bake at 350 degrees F for 40 to 50 minutes. Invert on serving platter. Remove pan after a couple minutes.

It was a great night. In fact, I was so busy having fun that I only took one photo. It's all I have to accompany this post. Oopsy! Until next time, which hopefully won't be too far away!